Friday, December 28, 2012

*RECYCLED BOTTLES TURN GLASSES*


I visited the Melbourne Design Market on the weekend and stumbled upon this gem. These beautiful glasses and jugs are actually recycled bottles.They still have the branding of their past lives on them. This clever glass blower has decided to bring a sustainable focus to her work. To create the glasses she cuts the top off the bottle and then melts it to widen the opening to the desired shape. Each glass is unique. What a great idea to reuse our waste!         
                                                                                                                        
 --------------------------------------------------------

Visité el Mercado de Diseño de Melbourne durante el fin e semana y tropecé con esta joya. Estos vasos y jarras son en realidad botellas recicladas. Aún podemos observar la marca de sus vidas pasadas. Esta sopladora de vidrio ha decidido darle un enfoque sostenible a su trabajo. Para crear los vasos corta la parte de arriba y derrite los bordes hasta conseguir la forma deseada. Cada vaso es único. Que idea tan genial para re-usar nuestros residuos.  


                                                                                                                                      Posted by Sara


PS: It is a pity that I can't do it myself because after this holly parties I have a bunch of bottles and I am running out of glasses. Lídia

PD: Es una pena que no lo pueda hacer yo misma en casa  porque después de estas fiestas tengo un montón botellas y me estoy quedando sin  vasos. Lídia                                                           

Thursday, December 27, 2012

*NOSES & EARS WITH EGG CUPS*


Para distraer a mis sobrinas  vi en Oh manualidades las naricitas con hueveras! Fácil y rápido de hacer. Yo diría que demasiado rápido porqué les ha sabido a poco y querían hacer más cosas. Por suerte se han inventado algo que no necesitaban mi ayuda! Medallones navideños. Me parecen muy monos. Tengo curiosidad para ver dónde los cuelgan.

------------------------------------------------------

To entretain my nieces I saw in Oh Manualidades  the noses with egg cups! Easy and quick to do. I would say too quick because they thought it was not enough and they wanted to do more crafts. Luckily, they have invented something that did not need my help! Christmas Medallions. I find them very cute. I have curiosity to see where they hung them.


PS: For the ones who doesn't know what it is this piece of wood with red cap  here it is a piece of info.


Monday, December 24, 2012

*CHRISTMAS RED FROM THE MIRROR*


Con el Merry Christmas desde mi espejo podéis ver también mi nueva Polaroid, las fotos resultantes y mis bolas del mundo que ya están pensado dónde será mi próximo viaje.
-------------------------

With the Merry Christmas from the mirror you can also see my new Polaroid, the pictures from my Bday party and my globes which are always with me to give me ideas about my next trip.

Saturday, December 22, 2012

*CHRISTMAS RED*


Lo primero que me evoca el color rojo es pasión. Pero estaba claro que en estas fechas el rojo pasaba por ser más cálido, menos agresivo, más navideño y entrañable. Mi propuesta a  parte de ser navideña pretende tener un toque distinto. Narices de payaso. Porqué? Porqué en estas navidades  no todo el mundo es feliz. Si nos ponemos la máscara más pequeña del mundo generaremos sonrisas y con ellas pequeños momentos de felicidad! Os recomendó que lo probéis.

--------------------------------------------

The first thing it comes to my mind when I listen to the word red, it is passion. But ,it is clear to me that due to the dates this red should be warm, less aggressive and more charming than usual. My Christmas proposal has a different approach. Christmas balls are made of clown's noses. Why? Because during Christmas not everybody is having a great time. We can wear the smallest mask of the world and generate smiles to the others. Generating smiles we generate small moments of happiness. I highly recommend it to you!


En esta propuesta tengo que agradecerle a mucha gente su granito de arena. A Abel mi compañero de teatro para darme la idea de la nariz, a Martina para ofrecerse a escribir Merry Christmas con alambre, a mi madre para tener la tela roja en el sitio adecuado en el momento adecuado y a Kiril para hacerme una buena foto para mostrar mi composición! La pistola de silicona, paciencia  y unas cuantas horas han hecho el resto!

-------------------------------------------


In this proposal, I have to thank many people their bit.To Abel my drama collague to give me the red nose idea, to Martina to offer herself to write down with wire Merry Chritsmas. To my mother because she had the red fabric at the right place at the right moment and to Kiril to do a good picture to be able to show my composition.  And a big THANK YOU TO  EVA who check & correct my English posts. A silicon gun, patience and some hours did the rest! 


No olvidéis checkear los otros blogs del reto:

-Choc Chef

-Salud a la carta

-Aquifistreamos


El mes que viene Amarillo! Alguien se apunta?

Tuesday, December 18, 2012

*HAPPY BIRTHDAY*


Happy Birthday to me :-) Cada día tengo más elementos para convertirme en una "Real Blogger" gracias por esta Polaroid tan chula!

----------------

Happy Birtday to me :-) Everyday I have more devices to become a "Real Blogger" thanks for this cool Polaroid present! 

Monday, December 17, 2012

*GREEN & RED STAR*


Decoración navideña fácil y rápida para la puerta de casa. Necesitamos una estructura como una corona o  una estrella,  plantas verdes y frutos rojos. También podemos ponerle una pequeña vela, piñas, canela.. En este caso no necesitaba más ya que al añadirle las piñas doradas he visto que no eran necesarias. O sea he decidido dejarlo así a veces menos es más.

-------------------

Easy and quick way to decorate our front door. We need some structure as a crown or a star,  nice green plants and  red fruits. If we want, we can add some small candles, pine cones, cinnamon... In this case, we keep it simple. Some times less is more. 


Thursday, December 13, 2012

*CUPCAKES, CAMERAS & Co*


Aquí va lo que hemos hecho con la masa que os expliqué el otro día (click aquí para ver la masa).  Inspiradas en el mismo video hicimos  Cupcakes y Cámaras para poder tener unos bonitos collares. Pero tuvimos invitadas de ultima hora y a las más peques les dimos "tema libre". Salieron donuts, pizzas, quesos, pasteles, un erizo monisimo... Con mis armas de tia Li tenía un plan B para la miscelánea. Son ahora unos estupendos imanes de nevera.

Here it is the second part of my last weekly post. Inspired by the same video we made Cupcakes & Cameras to have nice necklaces. However, we had 2 little guests at the last minute. We gave them " free topic" with the dough. They made donuts, pizzas, cheese, cakes...With my weapons of Auntie Li I had a nice plan for them. Now they are wonderful magnets. 


Paso a paso:
Step by step:

CUPCAKES:


Fig. 1
Fig. 2


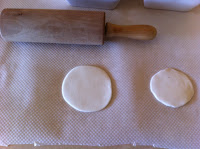
Cogemos la masa y hacemos una redonda Fig 1. Con un lápiz le damos la forma que podemos ver en la Fig 2. y si nos apetece le hacemos unas incisiones simulando el "papel" del cupcake. Para la parte de arriba hacemos un "xurrito" y lo podemos encima. Se puede pegar todo mojando con un poquito de agua. Para terminar la guinda. Si queremos que sea un collar le hacemos un agujero dónde más nos guste.

We form a round shape Fig 1. and with a pencil we can do the Fig 2. If we want we can mark little incisions on the side to simulate the incisions of the cupcake paper. On the top we do a snake shape and we rolled it. The final touch is the cherry. We can paste each part with water. If we want to make a necklace we make a hole.  This dough remains elastic and if the hole isn't big enough we can always enlarge it. We painted one week later. 


CÁMARAS:

Hacemos una plancha con la masa y recortamos dos rectángulos. Uno más grande que el otro. Lo pegamos con agua. Hacemos una redonda a continuación podemos dejar volar la imaginación. Objetivo, flash, botón de disparador...


We do a sheet with the dough and we cut 2 rectangles. One bigger than the other. We paste it with water, We add a circle. We can continue as far as our imagination let as do. With the lens, flash, shutter release button..


Cuando tenemos todos los objetos modelados los dejamos secar al sol.

Once we have finished with all the objects we let the objects dry under the sun or in the oven or near the heater. 


Nosotras lo hemos pintado al cabo de una semana. Y esta es otra de las partes que me parecieron innovadoras al ver el video. Aúnque se puede hacer con pinturas lo hacen con pinta uñas. Para unas niñas de 11, 8 y 5 años esto es LO MÁS! Bueno y para mi también jejejeje. Hicimos recolecta de todos los que habían por casa y a por ello.


We painted one week later. And this is another of the more innovative parts of the video, Although it can be painted with standard paints she painted with nail polish. For some girls of 11, 8 and 5 years old that was the coolest thing ever! It was pretty cool for me as well! We collected all varnish we found at home and we started  working.


Ejemplo del acabado: Pintamos cada parte por separado. Podemos hacer las cosas más precisas con un palillo. Y cuando este seco le ponemos la arandela para colgarlo como collar.

Example how the object can be finished: We painted each part separately. The final touches can be done with a toothpick. Once it is dry we can add the washer in case we are going to use it as a  necklace.  


Si queremos poner imán. Hay unas tiras de imán que por el otro lado tienen adhesivo. Se corta un trocito y se pega. Rápido y fácil.

If we want a magnet. There are magnet rolls that you can cut a piece and it is a magnet with one adhesive side. Easy and quick.

Monday, December 10, 2012

*CIRERER D'ARBOÇ*


La madre naturaleza también se prepara para la Navidad.
Mother nature is also getting ready for Christmas.


Arbutus Unedo                                                                                                                                    

Friday, December 7, 2012

*CON LAS MANOS EN LA MASA*


Hará cosa de un mes que mi Sobrina Martina me pidió que hiciésemos una manualidad. Acto seguido se fue a Internet y me enseño este vídeo. Yo un poco perpleja por su petición le dije que sí pero que antes necesitábamos conseguir los ingredientes y prepararlo todo muy bien. Realmente pensé que era la típica cosa que parecía muy fácil y al final era un poco complicada. Me daba apuro terminar con "las manos en la masa" y sin saber que hacer con ella.
Pues bien, al cabo de unas semanas nos dispusimos a ello. Lo hicimos tal cual lo cuento abajo y puedo decir, ahora sí por experiencia, que es muy fácil. Estoy encantada con el descubrimiento y lo voy a utilizar más de una vez. En la segunda parte de este post podréis descubrir todo lo que hemos hecho con ella. Las ventajas? Es muy elástica. Una vez ya seca  no se rompe aunque se caiga al suelo y se pueden por ejemplo ensanchar agujeros a última hora (en el caso que queremos hacer un collar). No lo he probado aún pero veo muy factible aplicarle un colorante desde inicio y colorearla. Hemos decidido que le vamos a poner nombre a nuestra masa. Alguna sugerencia?


About a month ago my niece Martina asked me to do a DIY that she found surfing the net. She showed me the following video. After the video I said yes Martina, we will do it but we need to get all these ingredients and prepare it very well. I thought seeing the video that it looked really  easy but it would  be more  difficult.  I was a bit scared thinking that this project could have a bad end with weird dough in my hands. After some weeks we had everything ready to start. We did it as I told you below and now I can say from my own experience that it is easy.I am in love with this discovery and I will use it more than once. In the second part of this post I will show everything we have done with the dough. Advantages? It is very elastic. Once it is dry, although it falls over, it doesn’t break. Perfect to do things with children. Even though I have not tried it, I think it will be possible to add some color to the dough. We have decided to name this dough because we don’t know how it is called. Any  suggestion?


Ingredientes                                                                                                    Ingredients

1 taza Maizena (Harina de maíz)                                                                         1 cup Cornflour
1 taza Cola  Blanca                                                                                            1c White glue
1cucharadita Glicerina                                                                                        1 teaspoon of Glycerin
1c Vaselina                                                                                                        1tsp of petroleoum jelly
1c  Aceite de bebé                                                                                             1tsp of baby oil.                  
1c  Vinagre                                                                                                        1tspVinegar


Una vez añadidos  todos los ingredientes lo empezamos a mezclar calentándolo a fuego lento. 
Once we have already added all the ingredients, we start to stir the dough and we heat it at low temperature.


Vamos removiendo la masa y si es muy líquida añadimos más maizena.
We keep on stirring the dough and if its too liquid we add more cornflour.


Cuando la masa ya no es pegajosa la empezamos a amasar  y ya está listo para usar.
When the dough isn't sticky, is ready  knead.


Cuando tenemos la masa lista ya podemos hacer todo lo que nos apeteza. Lo veremos en el siguiente post.
Once the dough is ready, we can do whatever we want. We will see it in the next post.

Tuesday, December 4, 2012

*CATALAN THANKSGIVING TURKEY*


Aunque llegue con retraso y en vez de un pavo sea un pollo de corral  tenemos una receta muy buena. La verdad es que yo sería incapaz de cocinar tal cosa... Pero tal y como lo explica Quim parece muy fácil.

Despite the fact that we are going behind schedule and we have a Chicken instead of a Turkey we have   a very yummy recipe. To tell you the truth I would be unable to cook this....However, if we follow Quim's instructions it seems quite easy. 

Ingredientes:                                                                                                                Ingredients:

Pollo o pavo                                                                                                         Chicken or Turkey
Zanahorias                                                                                                            Carrots
Cebolla                                                                                                                 Onions
Cabeza de ajo                                                                                                       Bulb of garlic
Ciruelas pasas                                                                                                        Prunes
Piñones                                                                                                                 Pine nuts
Orejones                                                                                                               Dry apricot
"Botifarres"                                                                                                           Catalan sausage
Un vasito de agua                                                                                                  Small water glass
Medio vaso de vino tinto                                                                                       1/2 wine of glass


Primero cortamos todas las verduras y las ponemos juntamente con los ajos en la bandeja del horno.
We chop the vegetables and put them  with the garlic cloves on the oven's tray.


Seguidamente nos disponemos a rellenar el pollo con los piñones, las ciruelas pasas y  "botifarres".
We continue stuffing the chicken with pine nuts, prunes and catalan sausages.


Ponemos el pollo en la bandeja y antes de ponerlo en el horno le añadimos el vasito de agua y el vino.
We put the chicken on the tray and before placing it in the oven we add the water and the glass of wine.


Durante la cocción recogemos el jugo que sueltan los ingredientes y lo vertemos sobre el pollo.
During the cooking time we get the juice that is delivered by the ingredients and we pour  it on the chicken.


Después de 2 horas y 15 minutos en el horno  a una  temperatura entre 150-180 ºC podemos ver el resultado final al principio del post. 
After 2 hours and 15  minutes in the oven at 150-180 ºC degrees we can see the final result at the beguinning of this post.

Monday, December 3, 2012

*HYDRANGEA*


La Hortensia es para mi una flor con clase. La pongas dónde la pongas nos da un toque de tradición y distinción.

-------------------------------

Hydrangea is a flower full of class . Wherever you choose to display it, it stands out as a symbol of tradition and distinction.