Showing posts with label DIY. Show all posts

Wednesday, June 26, 2013

*WHITE RECYCLED CANDLE HOLDER*


The Pantone Challenge había escogido blanco. El Blanco me parecía insípido, anodino, sin gracia. Hasta que me paré a pensar. Toda mi casa es blanca desde las cortinas a la mesa pasando por las puertas, las sillas, las paredes, los armarios y podría seguir. Porqué? Fue una decisión totalmente consiente. Me da paz, tranquilidad y luz. Cosas necesarias para estar bien en el hogar. Dicho así debería ser muy fácil hacer algo no? O sea que después del bloqueo inicial no tardé en encontrar un DIY blanco y veraniego adecuado para esta entrada de solsticio. Si es que algún día el verano decide quedarse porque este año no lo tenemos muy claro ;-). La idea esta inspirada en este blog.

I have chosen white for The Pantone Challenge.  White seemed tasteless, bland, unfunny. Until I stopped and I thought a little bit. My whole house is white from the curtains to the table through the doors, chairs, walls, cabinets and I could go on and on. Why? It was a totally conscious decision. It gives me peace, tranquillity and light. Needful things  to be confortable at home.  It seems it should be very easy to make something up? So, after the initial blocking, I  found a DIY in white suitable for the summer solstice,  if some day this year  summer  decides to stay  .... The idea is inspired by  this blog..
0) Materiales                                                                                                
-Latas vacías                                                                                                                                           -Empty cans
(en este caso las leches en polvo de Arlet)                                                                                                       (in this case Arlet’s milk powders)
-Pintura                                                                                                               -Painting
-Martillo                                                                                                              -Hammer
-Destornillador                                                                                                     -Screwdriver
-Alambre                                                                                                             -Wire

1) Una vez están las latas limpias las metemos en el congelador llenas de agua. Es la manera para poder hacer agujeros en la lata sin que se deforme. Un consejo, llenarlas hasta arriba del todo. Yo no lo hice y la lata se puede deformar más fácilmente.
1) Once the cans are clean place them in the freezer filled with water. It is the way to make holes in the can without deforming them. One tip, fill up untill the top. I did not do it and the can can be deformed more easily.

2) Marcamos dos agujeros en la parte superior para poder poner un asidero y también los puntos para el dibujo queremos en el centro.Una vez marcados los hacemos con el martillo y un destornillador o algo punzante.
2) We mark two holes in the top for a handle and mark with dots   the desired drawing in the center . Once the dots are marked use a hammer and a screwdriver or something sharp to make the holes.


3) Cuando este seco podemos empezar a pintar como más nos guste. En este caso hemos utilizado pintura pero también puede ser espray. Ah! Y en paralelo moldeamos un alambre un poco grueso para poder coger y colgar los porta velas dónde más nos gusten.
3) When is dried we can start painting. In this case we used paint but we  can also use spray. Ah! In parallel we mold a thick wire to make a handle to hang the candle cans.

4) Uno de los botes no lo hemos agujereado y lo hemos pintado para tener un jarrón reciclado. Finalmente lo hemos aderezado todo con un ramo de umbelíferas silvestres.
4)We haven’t drilled all the cans, because so we   have a recycled flower pot   . Finally we topped it all with a bouquet of wild Umbelliferae.

Todo preparado para las fiestas de Verano ahora sólo falta el calor!
Everything ready for our summer  parties,  we just need a hotter weather!!!


No olvidéis checkear los otros posts del reto: 
Don't forget to check the other blogs of the challenge:


Friday, May 31, 2013

*NAVY ANCHOR PADS*


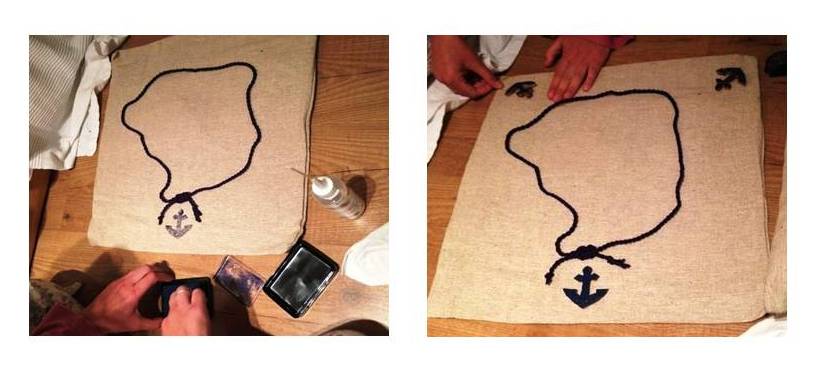
Hace tiempo vi esta idea. Un día encontré 3 cojines en las rebajas y los guardé en el altillo. Ahí estaban los pobres nuestros de risa. Como otras muchas cosas que tengo en “pendientes”.  Navy blue me inspiraba  marinero, áncoras, estampación… Hacia tiempo que quería probar la técnica de estampación modelando tampones. Pero no me atrevía. Soy muy mala modelando, dibujando, cantando… En fin, una tiene que acéptalo!  Y qué mejor que invitar una amiga al reto? Se lo pedí a  Inês y ella me ayudó encantada. Me encargué de tener todo el material necesario. Primero fui a la tienda dónde hace tiempo descubrimos juntas  las pinturas para ropa y ahí compré las almohadillas para estampar. The Vostok  Printing shop. Después me fui a la Abacus a ver qué encontraba para darle un toque a los cojines y finalmente un poco de lana para las borlas. Aunque también terminamos haciendo un hilo marinero como habéis visto en la foto.

Some time ago I saw this idea. One day I found 3 cushions in the sales and I kept them in the attic. They have been there for so long…. Like many things that I have in "to do’s". Navy blue inspired me sailing, anchors, stamping ... It’s a long time since I wanted to try modeling an inkpad and enjoy this printing technique. But I did not dare, I am very bad modeling, drawing, singing ... Anyway, one has to accept it! And what better that inviting a friend to the challenge? I asked Inês and she helped me, delighted.I went to buy all the necessary material. First, I went to the store where we discovered together the paints for clothes and I bought stamp pads. The Vostok Printing shop. Then I went to the Abacus to find something  to give a touch to the cushions and finally a bit of wool for the tassels. But we also ended up making a sailor thread  as you have seen in the photo.


0)Material:


 1) Modelar un tampón: Va muy bien hacerlo con corcho, si sabes, es fácil. Después lo “mojamos “con la tinta y lo aplicamos 2 o 3 veces hasta conseguir la intensidad de color deseada. Para fijar bien la pintura al terminar tenemos que planchar la ropa.
1) To  model a stamp: it works very well with cork, if you know how to do it, it's easy. After dipping it in  ink,  apply it 2 or 3 times until getting the desired color intensity. To set the paint , we have to iron the cushions .


2) El hilo marinero lo hemos hecho con lana. Cogiendo hilo doble y haciéndolo girar sobre sí mismo. Terminándolo con un nudo marinero al final. Lo hemos cosido al cojín y después le hemos estampado las  ancoras.
2) We have done the sailor thread with wool. Taking double thread and turning on itself, and finishing it with a sailor knot . We've sewn it to the cushion and then we stamped the anchors.


3) Para el de líneas hemos empezado por los “pinceles” que compré en el Abacus pero las partes más oscuras las hemos terminado con una esponja de zapatos para darle más intensidad. También se tiene que planchar para fijar la pintura al final.
3) For the cushion with lines we  began with the brushes that I bought at the Abacus, but we paint  the darker parts with a sponge shoe to add intensity. You also have to iron to set the paint when you finish.


4) Los pompones son muy fáciles y resultones de hacer. Se recortan 2 circunferencias iguales de cartón con una circunferencia  vacía en el medio. Se atan con lana y se empieza a darle vueltas hasta que no queda agujero en el medio. Después se corta  justo por el medio entre los 2 cartones y finalmente se le ata un hilo por el sito dónde hemos cortado.
4) The pompoms are very easy and nice to do. Cut two equal cardboard circumferences  with an empty circumference in the middle. Tie them with wool and begin to pass the wool through the hole and around the cardboard until there is no hole in the middle. Then, cut right  in  between  the 2 cardboards and finally  tie a thread just  around the place  we’ve cut.


No olvidéis checkear los otros posts del reto: 
Don't forget to check the other blogs of the challenge:

Wednesday, April 24, 2013

*THE ART OF YARN BOMBS*


Are the trees cold? Are they fashion conscious? Do they want to fit in with the colourful crowd on Melbourne’s busiest square? Yarn bombs like this one at Melbourne’s St Peters church, always make me stop and smile and wonder what it’s all about.

Yarn bombs are usually installed under the cover of darkness, so that when morning comes, passers-by can enjoy a colourful surprise. This installation featured a range of individual works, colourful patterns and stitches. The group responsible for these works is on facebook so if you're interested in knowing more about them check out their facebook site. Yarn bombing is now a popular worldwide movement, a type of street graffiti - the best part being that they can be easily removed without any damage whatsoever. So what’s it all about anyway? Well it's art, the beauty of it is we don’t need to understand it, just enjoy it.

                                                                                                                         Posted by Sara

-----------------------------------


Son fríos los árboles? ¿Son conscientes de la moda? ¿Quieren encajar con la multitud de colores en la plaza más concurrida de Melbourne? Bombas de hilo como esta en la iglesia de Melbourne St Peters, siempre me hacen parar, sonreír y preguntarme de que va todo esto.
Las bombas de hilo normalmente se instalan bajo el amparo de la oscuridad, para que cuando llegue la mañana, los transeúntes puedan disfrutar de su sorprendente colorido. La instalación cuenta con una serie de obras individuales, con patrones de colores y tipos de puntos distintos. Este grupo tiene una página de Facebook, si queréis saber más sobre ellos podéis echar un vistazo aquí.
Bombardeo del hilado es ahora un movimiento popular a nivel mundial, un tipo de pintada de la calle - la mejor parte es que se pueden eliminar fácilmente sin daño alguno. Entonces, ¿qué es todo esto? Bueno, es arte, la belleza está en que no necesitamos entenderlo, simplemente podemos disfrutarlo.

                                                                                                                         Posteado por Sara.


Monday, April 15, 2013

*TRIBUTE TO GREEN PLANTS*


Las innumerables  flores ya han empezado con sus explosiones de color. Todos los campos están llenos y también los árboles frutales. Pero en esta ocasión he querido rendir un pequeño homenaje a las plantas verdes. Porque son ellas las que nos acompañan durante todo el año. Nos dan vida, nos dan luz e ilusión para seguir adelante en los duro inviernos y nos guían hasta la dulce primavera.

The countless flowers have already started with explosions of color. All fields are full of them and fruit trees too. But this time I wanted to pay a tribute to green plants. Because they are the ones that are with us during all the year. They give us life, light and hope to move forward in the harsh winters and guide us until the sweet spring.


Para darle un toque más verde si se puede hemos decorado algunas macetas. Mientras las estábamos pintando se nos ha ocurrido una manera de darles un  acabado al estilo “bayeta” . Muy rápido y resultón!

To give it a greener color,if  it's possible, we  have decorated some pots with watercolors and at the last minute we have foamed over another shade of green.  A “wipe” style finish. Easy, quick and good looking!


Para acabar este post me gustaría dejaros algunos de las nombres de las plantas.  Para mi cada planta tiene su historia. Pero muchas veces no sabemos ponerle nombre a las "hojas verdes". Tenemos aspidistras Aspidistra Elatior que son estas hojas anchas que nos remiten a las abuelas. También el típico Potus Scindapsus aureus y la yedra hereda hélix. Y dos plantas del género de los  Plectranthus que son las que podemos ver a cada lado del teléfono.

To end this post I would like to leave you some names of these plants. For me each plant have an history. But often we do not know the name of  the "greens leaves". We can see aspidistras Aspidistra Elatior those broadleaf that remind us our  grandmothers. We also have the typical Potus Scindapsus aureus and commom ivy hereda hélix. And two plants from  Plectranthus  genre that we can see on each side of the phone.


Como siempre no olvidéis checkear los otros blogs del reto  Verde Pantone Challenge:
Don't forget to check the other Blogs for The Green Pantone Challenge:

*Choc-chef

*Aquifistreamos

Wednesday, March 20, 2013

*NEON PINK SHELVES *


Oí la palabra rosa para este Pantone Challenge y sabía por dónde tirar. Tenía una asignatura pendiente. Hace un par de años cuando me mudé a mi apartamento había un viejo espejo de plástico azul que quería pintar rosa flúor pero me quedo marrón :-(.  Una cosa tenía clara, esta vez lo iba  a conseguir!Tardé más de lo esperado en encontrar un objeto el cuál poder esprayar a gusto. Un mueble me parecía poco acertado y no tenía otro espejo disponible.  Cuando vi estas bobinas de cartón duro pensé que estaría muy bien reciclarlas. Me las llevé y  manos a la obra...

When I listened to the word pink for  this Pantone  Challenge I knew where to shoot. I had a pending issue. A couple of years ago when I moved into my apartment I had an old blue plastic mirror which I wanted to paint  neon pink but I end up with a brownish one  :-(. One thing was clear to me, this time I was going to get it!It took longer than expected to find a suitable object to spray. I thought that a furniture was unwise  and I had no other mirror available. When I saw these cardboard reels I thought that recycling them it would be a good idea. I took them and get to work ...


1) Primero lo pinté de blanco para obtener una base neutra dónde aplicar el rosa.
1) Firstly, I painted them inwhite to have a neutral base to apply the pink.

2) Cubrí la zona interior con cinta adhesiva protectora para mantener la parte interior blanca. No nos engañemos todo rosa flúor es un poco demasiado para ponerlo en casa.
2) Secodly, I covered the inside area to keep it white with masking tape. I think that the entire reel neon pink is a bit too much to put it at home.

3) Una vez seca la parte blanca. Pinte la parte exterior de rosa.
3) Once the white part was dry. I painted the outside in pink.


Mi idea era hacer unas bonitas estanterías. Pero dónde ponerlas? Y a mi hermana le gusto tanto la idea que han quedado adjudicadas para la habitación de mi sobrina Arlet!
Consejos Prácticos: Pintar con espray puede ser a veces bastante más caro que con pintura. La verdad es que gasté 3 botes de blanco. Pero el rosa me ha durado para todas las bobinas y aún me sobra. El mecanismo es distinto y se reparte mucho mejor. Recomiendo esta marca que no conocía y me ha funcionado muy bien.

My idea was to make some nice shelves. But where to put them? My sister liked the idea so much that she has used them to decorated my niece´s room.
Tips: Painting with spray can sometimes be far more expensive than standard paint. The truth is that I spent quite a lot of money - three white sprays-. But pink has lasted me for all coils and even spare me. The mechanism is different and the paint is distributed much better. I recommend this brand that I did not know and it has worked very well.


No olvideís checkear el Pantone Challenge Rosa de:
Don't forget to check the other Blogs for The Pink Pantone Challenge:

*Aquifistreamos

*Salud a la Carta

*Choc-chef

Tuesday, February 12, 2013

*BAKER'S TWINE NECKALCE*


Ya os conté que había hecho más cositas con Baker's twine. Este collar es un ejemplo. He hecho algunos más pero ya los he regalado. Siempre me gusta combinar diferentes materiales: metal, hueso, conchas... Creo que en verano tendrán mucho más juego...Pero no pude esperar :-)
--------------------------------------
As I told you that I had done more things with Baker's twine. This necklace is an example. I made some more but I have already given them. I always like to combine different materials: metal, bone, shells ... I think that in summer baker's twine will suits more.  But I couldn't wait :-)


Friday, January 25, 2013

*TIETA LI x 6*


Y ya van seis. Mis hermanos han llenado la caja de huevos y soy Tieta Li de 5 preciosas niñas y 1 Principito muy guapo! Ayer por la tarde nació Arlet. Tenía algo especial preparado para ella. La idea vino de Muy Molon. Esta tienda tan molona de internet.Y le di mi toque especial. Me fui a Limo para comprarle cosas útiles. La pobre niña nace en pleno invierno tendrá que llevar guantes y también unos buenos calcetines. Pero fui añadiendo cosas a la cesta de la compra porque en Limo tienen cosas tan monas! Que si un pañuelo de algodón "funky" para las babas, unas banderolas para la habitación...Todo bien atado con Baker's twine*.
----------------------------------------------------------------------------------------

The sisxth has arrived. My siblings have filled the egg box and I am Aunty Li of 5 beautiful girls and 1 handsome Prince! Yesterday, Arlet was born. I had something special prepared for her. The idea came from Muy Molon. Muy Molon is an internet cool shop. But I gave my special touch. I went to buy useful stuff at Limo. The poor girl has born in winter and she will have to wear gloves and some good socks! However  in Limo there where so many cute things. I couldn’t stop myself enlarging my shopping cart with a "funky" cotton handkerchief for the drool, some banners for the room ... All neatly tied with  Baker's twine*.


* Comparto dónde he comprado este hilo porque me ha costado mucho encontrarlo y I LOVE KUTCHI es el mejor sitio en variedad y precio para Baker's twine en Barcelona que encontré. Esta escondida por las calles de la Barceloneta pero vale la pena visitarla. En próximos posts veréis que collares he hecho con este hilo de distintos colores.

*I share where I bought  this thread because I had a hard time finding it and I LOVE KUTCHI  is the best place regarding  price  and range for Baker's twine  I found in Barcelona.It  hidden through  Barceloneta`s streets but it is  worth a visit. In future posts you will see necklaces  that I did with these threads of various colors.

Thursday, January 17, 2013

*RECYCLED WINE BOX II*


Seguro que en estas fiestas a más de uno le han regalado una caja de vinos. Uno de mis primeros post fue de cajas de vino recicladas. Aunque aquellas estaban colgadas tal cuál y a ésta le hemos dado un toque especial.  Era la primera vez que me ponía a ello y estoy muy contenta del resultado. Y creo que Maite, la propietaria de la caja, también!
Surely this holiday more than one would have been given a box of wine. One of my first post was a recycled wine box. Although, this time we have given it a special touch. It was the first time I did it and I'm very happy with the result. And I think Maite, the owner of the box, too!


Material:


      -Caja de vino. Wine box.
      -Lija de grado medio. Medium grade sandpaper.
      -Pinturas acrílicas al agua. Water- acrylic paints.
      -Pinceles. Brushes.
      -Cera Álex. Furniture's wax.
      -Betún de Judea. Asphalt.


Paso a paso: Primero tenemos que decidir el  color que queremos pintar la caja. Cosa que nos ha costado bastante, hemos ido del azul al verde pasando por el rojo pero al final creo que hemos tomado una buena decisión con el gris. La pintaremos de dos colores o 2 tonos del mismo color. La primera capa de un tono más oscuro y la segunda de un tono más claro. Así cuando pasamos la lija por la segunda capa queda al descubierto la primera y da un efecto muy bonito.
Step by step: First we have to decide which color we want to paint the box. Which has cost us a lot, we went from blue to green through red ,but in the end I think we made a good choice with the gray. We will paint it with two colors or two shades of the same color. The first layer of a darker shade, and the second of a lighter shade. So, when we  sand the second layer , the first one is partly exposed  and gives us a nice effect.


Empecemos  por limpiar la caja y pasarle la lija (1). A continuación pintamos la primera capa con el color escogido, no hace falta que esté muy bien pintado ya que si se ve un poco de madera una vez encerado también le da un toque (2). Después le aplicamos la segunda capa de un tono más claro (3). Una vez se seca la pintura pasamos la lija otra vez. Siempre en dirección a las vetas de la madera. Lijamos más o menos según el efecto que queremos al final. Un consejo no tengáis miedo, primero da miedo lijar pero queda muy bien (4). A continuación le aplicamos con un trapo de algodón una mezcla de Betún de Judea con cera (5). Finalmente le aplicamos cera natural y ya está listo (6)
Let's start by cleaning and  sanding the box (1).Then paint the first layer with the color chosen, this doesn't  need to be  painted very well because if you see some wood at the end with  the wax it is also cosy (2). Then we apply the second layer of a lighter shade (3). Once the paint is dry we  sand  again. Always in the direction of the wood grain. We can use lighter or harder sandpaper to achive the desired final effect. We can sand stronger without fair.In the end, the effect is worth it.(4). Then we apply a mixture of asphalt and wax with a cotton cloth  (5). Finally we apply natural wax and it is ready (6)


Una vez colgada en la pared sólo falta llenarla con todo lo que queramos.
Once it is in the wall we need to fill it with whatever we want.


Thursday, December 27, 2012

*NOSES & EARS WITH EGG CUPS*


Para distraer a mis sobrinas  vi en Oh manualidades las naricitas con hueveras! Fácil y rápido de hacer. Yo diría que demasiado rápido porqué les ha sabido a poco y querían hacer más cosas. Por suerte se han inventado algo que no necesitaban mi ayuda! Medallones navideños. Me parecen muy monos. Tengo curiosidad para ver dónde los cuelgan.

------------------------------------------------------

To entretain my nieces I saw in Oh Manualidades  the noses with egg cups! Easy and quick to do. I would say too quick because they thought it was not enough and they wanted to do more crafts. Luckily, they have invented something that did not need my help! Christmas Medallions. I find them very cute. I have curiosity to see where they hung them.


PS: For the ones who doesn't know what it is this piece of wood with red cap  here it is a piece of info.


Thursday, December 13, 2012

*CUPCAKES, CAMERAS & Co*


Aquí va lo que hemos hecho con la masa que os expliqué el otro día (click aquí para ver la masa).  Inspiradas en el mismo video hicimos  Cupcakes y Cámaras para poder tener unos bonitos collares. Pero tuvimos invitadas de ultima hora y a las más peques les dimos "tema libre". Salieron donuts, pizzas, quesos, pasteles, un erizo monisimo... Con mis armas de tia Li tenía un plan B para la miscelánea. Son ahora unos estupendos imanes de nevera.

Here it is the second part of my last weekly post. Inspired by the same video we made Cupcakes & Cameras to have nice necklaces. However, we had 2 little guests at the last minute. We gave them " free topic" with the dough. They made donuts, pizzas, cheese, cakes...With my weapons of Auntie Li I had a nice plan for them. Now they are wonderful magnets. 


Paso a paso:
Step by step:

CUPCAKES:


Fig. 1
Fig. 2


Cogemos la masa y hacemos una redonda Fig 1. Con un lápiz le damos la forma que podemos ver en la Fig 2. y si nos apetece le hacemos unas incisiones simulando el "papel" del cupcake. Para la parte de arriba hacemos un "xurrito" y lo podemos encima. Se puede pegar todo mojando con un poquito de agua. Para terminar la guinda. Si queremos que sea un collar le hacemos un agujero dónde más nos guste.

We form a round shape Fig 1. and with a pencil we can do the Fig 2. If we want we can mark little incisions on the side to simulate the incisions of the cupcake paper. On the top we do a snake shape and we rolled it. The final touch is the cherry. We can paste each part with water. If we want to make a necklace we make a hole.  This dough remains elastic and if the hole isn't big enough we can always enlarge it. We painted one week later. 


CÁMARAS:

Hacemos una plancha con la masa y recortamos dos rectángulos. Uno más grande que el otro. Lo pegamos con agua. Hacemos una redonda a continuación podemos dejar volar la imaginación. Objetivo, flash, botón de disparador...


We do a sheet with the dough and we cut 2 rectangles. One bigger than the other. We paste it with water, We add a circle. We can continue as far as our imagination let as do. With the lens, flash, shutter release button..


Cuando tenemos todos los objetos modelados los dejamos secar al sol.

Once we have finished with all the objects we let the objects dry under the sun or in the oven or near the heater. 


Nosotras lo hemos pintado al cabo de una semana. Y esta es otra de las partes que me parecieron innovadoras al ver el video. Aúnque se puede hacer con pinturas lo hacen con pinta uñas. Para unas niñas de 11, 8 y 5 años esto es LO MÁS! Bueno y para mi también jejejeje. Hicimos recolecta de todos los que habían por casa y a por ello.


We painted one week later. And this is another of the more innovative parts of the video, Although it can be painted with standard paints she painted with nail polish. For some girls of 11, 8 and 5 years old that was the coolest thing ever! It was pretty cool for me as well! We collected all varnish we found at home and we started  working.


Ejemplo del acabado: Pintamos cada parte por separado. Podemos hacer las cosas más precisas con un palillo. Y cuando este seco le ponemos la arandela para colgarlo como collar.

Example how the object can be finished: We painted each part separately. The final touches can be done with a toothpick. Once it is dry we can add the washer in case we are going to use it as a  necklace.  


Si queremos poner imán. Hay unas tiras de imán que por el otro lado tienen adhesivo. Se corta un trocito y se pega. Rápido y fácil.

If we want a magnet. There are magnet rolls that you can cut a piece and it is a magnet with one adhesive side. Easy and quick.

Friday, December 7, 2012

*CON LAS MANOS EN LA MASA*


Hará cosa de un mes que mi Sobrina Martina me pidió que hiciésemos una manualidad. Acto seguido se fue a Internet y me enseño este vídeo. Yo un poco perpleja por su petición le dije que sí pero que antes necesitábamos conseguir los ingredientes y prepararlo todo muy bien. Realmente pensé que era la típica cosa que parecía muy fácil y al final era un poco complicada. Me daba apuro terminar con "las manos en la masa" y sin saber que hacer con ella.
Pues bien, al cabo de unas semanas nos dispusimos a ello. Lo hicimos tal cual lo cuento abajo y puedo decir, ahora sí por experiencia, que es muy fácil. Estoy encantada con el descubrimiento y lo voy a utilizar más de una vez. En la segunda parte de este post podréis descubrir todo lo que hemos hecho con ella. Las ventajas? Es muy elástica. Una vez ya seca  no se rompe aunque se caiga al suelo y se pueden por ejemplo ensanchar agujeros a última hora (en el caso que queremos hacer un collar). No lo he probado aún pero veo muy factible aplicarle un colorante desde inicio y colorearla. Hemos decidido que le vamos a poner nombre a nuestra masa. Alguna sugerencia?


About a month ago my niece Martina asked me to do a DIY that she found surfing the net. She showed me the following video. After the video I said yes Martina, we will do it but we need to get all these ingredients and prepare it very well. I thought seeing the video that it looked really  easy but it would  be more  difficult.  I was a bit scared thinking that this project could have a bad end with weird dough in my hands. After some weeks we had everything ready to start. We did it as I told you below and now I can say from my own experience that it is easy.I am in love with this discovery and I will use it more than once. In the second part of this post I will show everything we have done with the dough. Advantages? It is very elastic. Once it is dry, although it falls over, it doesn’t break. Perfect to do things with children. Even though I have not tried it, I think it will be possible to add some color to the dough. We have decided to name this dough because we don’t know how it is called. Any  suggestion?


Ingredientes                                                                                                    Ingredients

1 taza Maizena (Harina de maíz)                                                                         1 cup Cornflour
1 taza Cola  Blanca                                                                                            1c White glue
1cucharadita Glicerina                                                                                        1 teaspoon of Glycerin
1c Vaselina                                                                                                        1tsp of petroleoum jelly
1c  Aceite de bebé                                                                                             1tsp of baby oil.                  
1c  Vinagre                                                                                                        1tspVinegar


Una vez añadidos  todos los ingredientes lo empezamos a mezclar calentándolo a fuego lento. 
Once we have already added all the ingredients, we start to stir the dough and we heat it at low temperature.


Vamos removiendo la masa y si es muy líquida añadimos más maizena.
We keep on stirring the dough and if its too liquid we add more cornflour.


Cuando la masa ya no es pegajosa la empezamos a amasar  y ya está listo para usar.
When the dough isn't sticky, is ready  knead.


Cuando tenemos la masa lista ya podemos hacer todo lo que nos apeteza. Lo veremos en el siguiente post.
Once the dough is ready, we can do whatever we want. We will see it in the next post.

Wednesday, November 28, 2012

*NECKLACES, NECKLACES, NECKLACES*


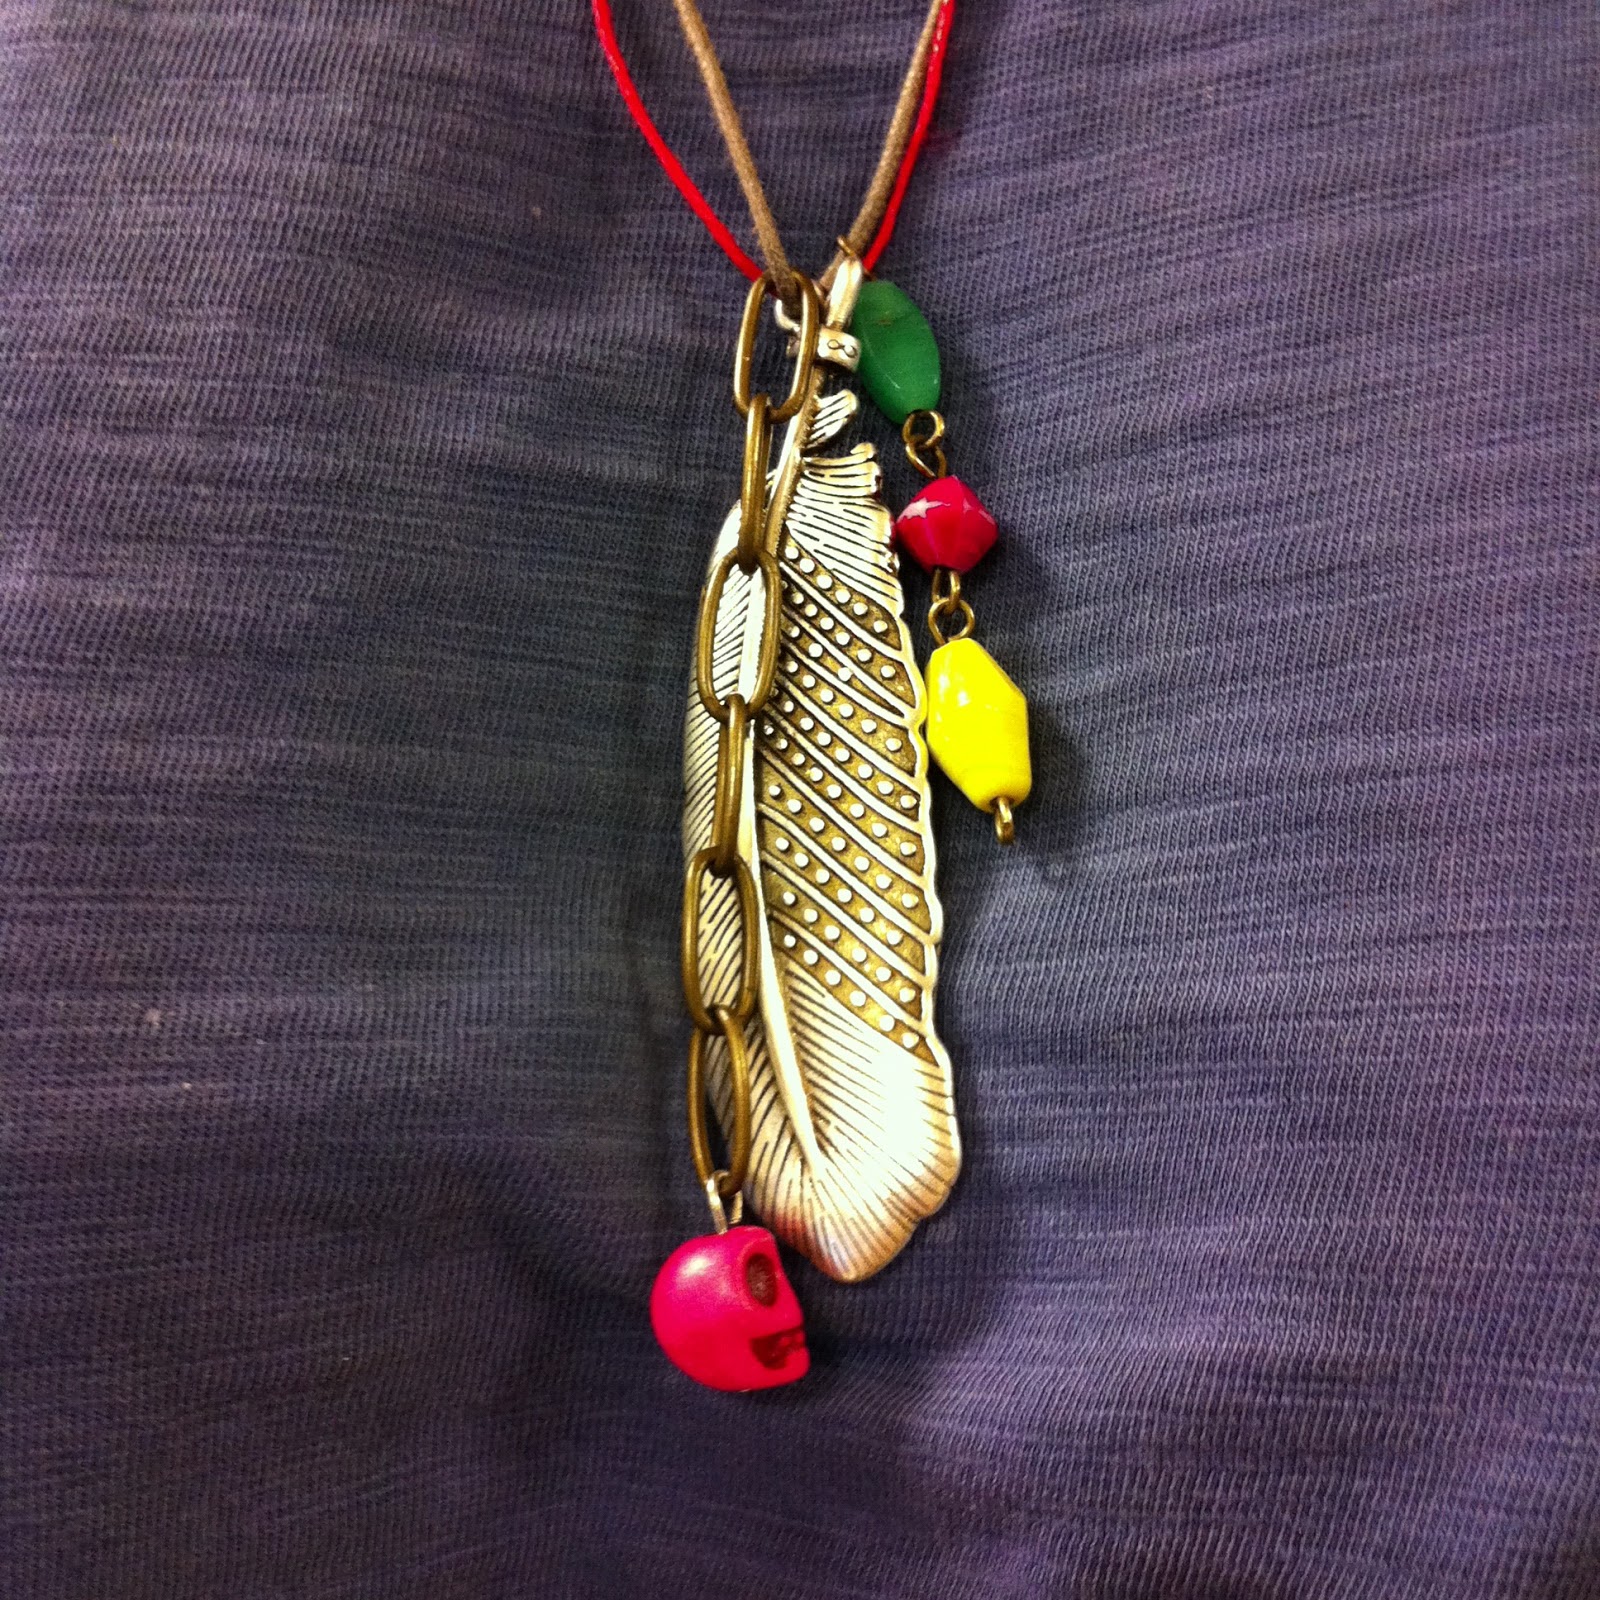
Perdí un par de collares en las ultimas semanas y los otros que tengo me parecen muy veraniegos. La necesidad de visitar la calle del call en Barcelona se hacía cada vez más urgente. Tenía muchas ganas de perderme por las tiendas y ver qué había de nuevo para esta temporada. Sí, sí, habéis oído bien. Las tiendas de cuentas van por temporadas como cualquier otra tienda de moda. En fin, no encontraba el tiempo para ir hasta el pasado miércoles. Vi cosas que me gustaron como plumas, calaveras, mini jaulas de pájaros... Compré cuentas de oro viejo y también cadenas de todo tipo. Además de hilos de algodón y como siempre me dejé alguna cosa en la recamara para poder volver pronto. Al llegar a casa hice el primer collar, de Plumas & Calaveras con hilos de algodón. Ahora que ya lo he llevado un par de días lo que más me gusta es el "cling cling" que hace cuando lo llevo puesto.

-----------------------------

I lost a couple of necklaces lately, the  ones I still have are pretty much for summer. So that, It was quite urgent for me to go to Call's Street in Barcelona. I was looking forward seeing what was new for this season. Yes, You listen it right!  The Beads shops have seasons like any other fashion store. But I was running out of time. However, last Wednesday I made time for it. I saw things that I like it as feather,  skulls, small bird cages... I bought old gold beads and different types of chains. I also bought cotton thread and I kept something for next time to make sure that I will be back there soon. Once I got home I made my first necklace of feather and skulls with cotton thread. After a couple of days of wearing it the thing I like the most is the sound it make when is it in movement.

Feather & Skull neklaces

Thursday, November 15, 2012

*RECYCLED FRUIT BOX*


Visitando amigos voy llenado mi blog de ideas de decoración originales. Fácil y queda muy bien, realmente 
mejor que en la foto. Las cajas de fruta de toda la vida con una mano de pintura y venga ya están 
reconvertidas en estanterías de pared.

----------------------
Visiting friends I am filling my blog of original decoration ideas, easy and very nice, actually It looks better in real life than in the picture. The only things you need are these fruit boxes and some paint. Here you have a wonderful shelves for your house.